In this recipe, you will learn how to dispatch a message to your existing email subscribers, encouraging them to opt in to receive SMS marketing communications, in four simple steps viz:
- Create an embedded on-site SMS signup form
- Create a segment of potential SMS subscribers
- Create a campaign encouraging email subscribers to sign up for SMS
- Review results
In essence, by following the process outlined in this recipe, your email subscribers will be able to conveniently sign up for receiving marketing-related notifications from your organization via the SMS channel.
Consent for SMS marketing can be collected through email in both targeted campaigns and journeys. For instance, post-purchase workflows present a favorable opportunity to advertise the SMS program and increase the probability of gathering sign-ups.
Table of Contents
Prerequisites
You will have to fulfill the undermentioned prerequisites prior to dispatching campaigns tailored to procure SMS marketing consent from email subscribers:
- Configure SMS in your NotifyVisitors account.
- Set up your mobile terms of service and privacy policy.
Dispatch an email campaign to request consent for SMS marketing
We recommend that you follow the undermentioned 'steps' in order to obtain consent from your existing email subscribers for dispatching marketing related communications through the SMS channel in the near future:
Step 1: Create an embedded on-site SMS signup form
Begin by designing an on-site signup form. During the designing process, format it to match your brand’s style or design scheme (brand’s color code, brand’s font etc.). Kindly check the undermentioned articles in case you do not already know how to create an on-site signup form.
Here, we’ll briefly explain how you can create one:
- Navigate to the Dashboard > On-Site > Signup Form.

- Click on the tab titled 'Signup Form' and then click on the button titled 'Create Signup Form'.
- Upon doing so, you’ll be presented with the option to either choose from certain pre-existing signup form templates or to create one from scratch.
- Meaning, you’ll have the option to either choose a ready-made template that can be tweaked to match your brand’s design scheme or build a new one from the ground up.
- Simply click on either the 'Create from scratch' button or one of the customizable preconfigured templates, as per your decision.
There are primarily two kinds of forms namely 'Slider' and 'Sticky'. Off-the-rack templates exist for both the form types and can be accessed separately by means of radio buttons (screenshot provided below).
In case you choose to create a signup form from scratch by clicking on the 'Create from scratch' button, then through a pop-up, you’ll be prompted to select one of either of the two form types.

- Once you choose the desired form type, you’ll be presented with yet another pop-up, wherein you will have to specify certain 'Form Details' such as its title, its exact position on the web page, the distinct segment within which the software shall systematically collect data/information provided by various users by means of filling up the signup form.
- In this specific case however, the collected data shall primarily pertain to whether an email subscriber has opted-in to receive marketing communications through the SMS channel or not. After entering the requisite details, kindly click on the 'Create' button present within the same pop-up.

- Upon doing so, the 'Form Editor' screen shall follow, wherein you can (in a step-by step manner), granularly configure your signup form by means of five tabs namely: Description, Thank You, Settings, Targeting Rules and Integration.
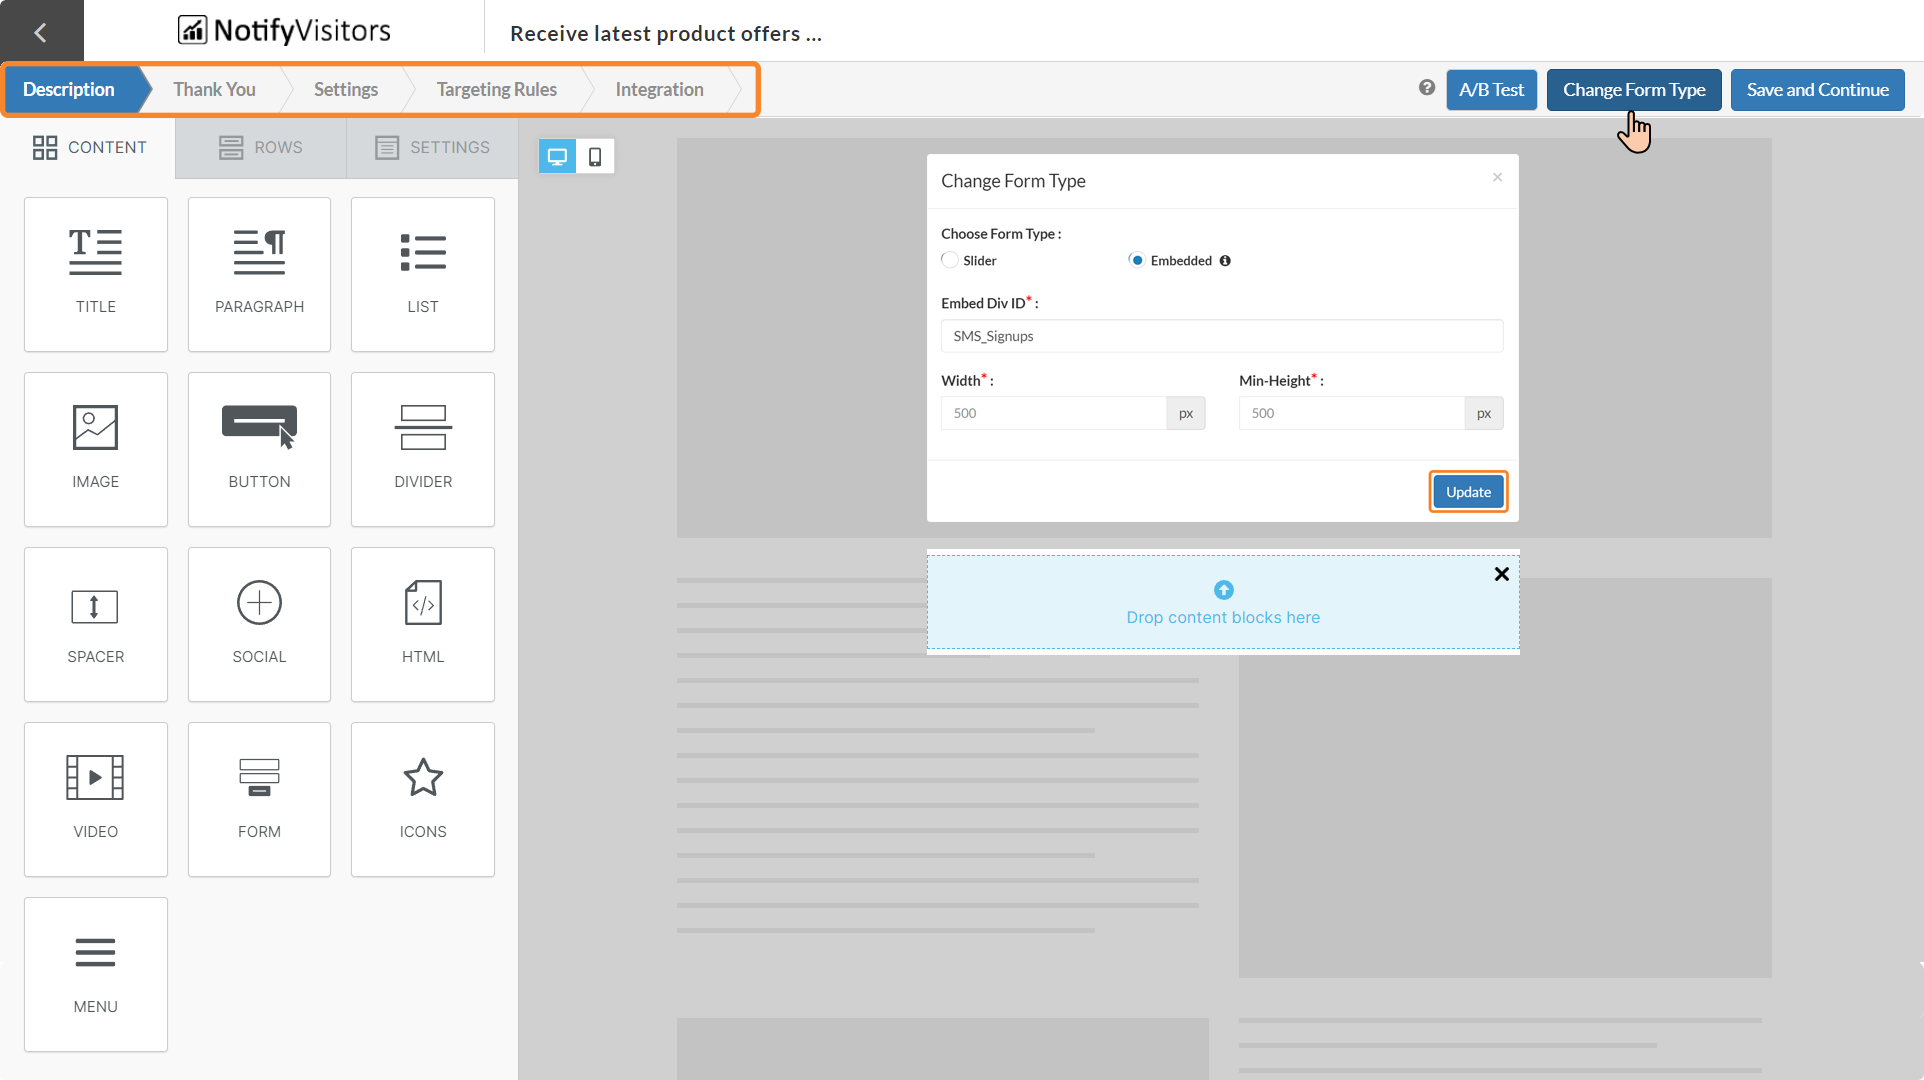
- On the very first tab i.e., the 'Description' tab, you’ll notice that there exists a button titled 'Change Form Type'.
- Kindly click on that button, and in the pop-up that appears next, click on the 'Embedded' radio button, then in the text field titled 'Embed Div ID' enter the identification ID for your embedded signup form.
- You may also adjust the width and height of the form from within the same pop-up. Next, click on the 'Update' button present within the same pop-up.
- While designing your signup form (as per the process described in the article titled 'How to design a signup form') remember to include a 'Phone Number' block within it through which users may provide their contact number. If required, also add the 'SMS marketing disclaimer' in the signup form.
- Continue configuring your form by following the process described in the aforementioned article and progress towards the 'Targeting Rules' tab.
- Next, click on the 'Configure Page URLs' option. Via this particular option you can control on which specific web page(s) of your online store or organization’s website the signup form should get displayed.
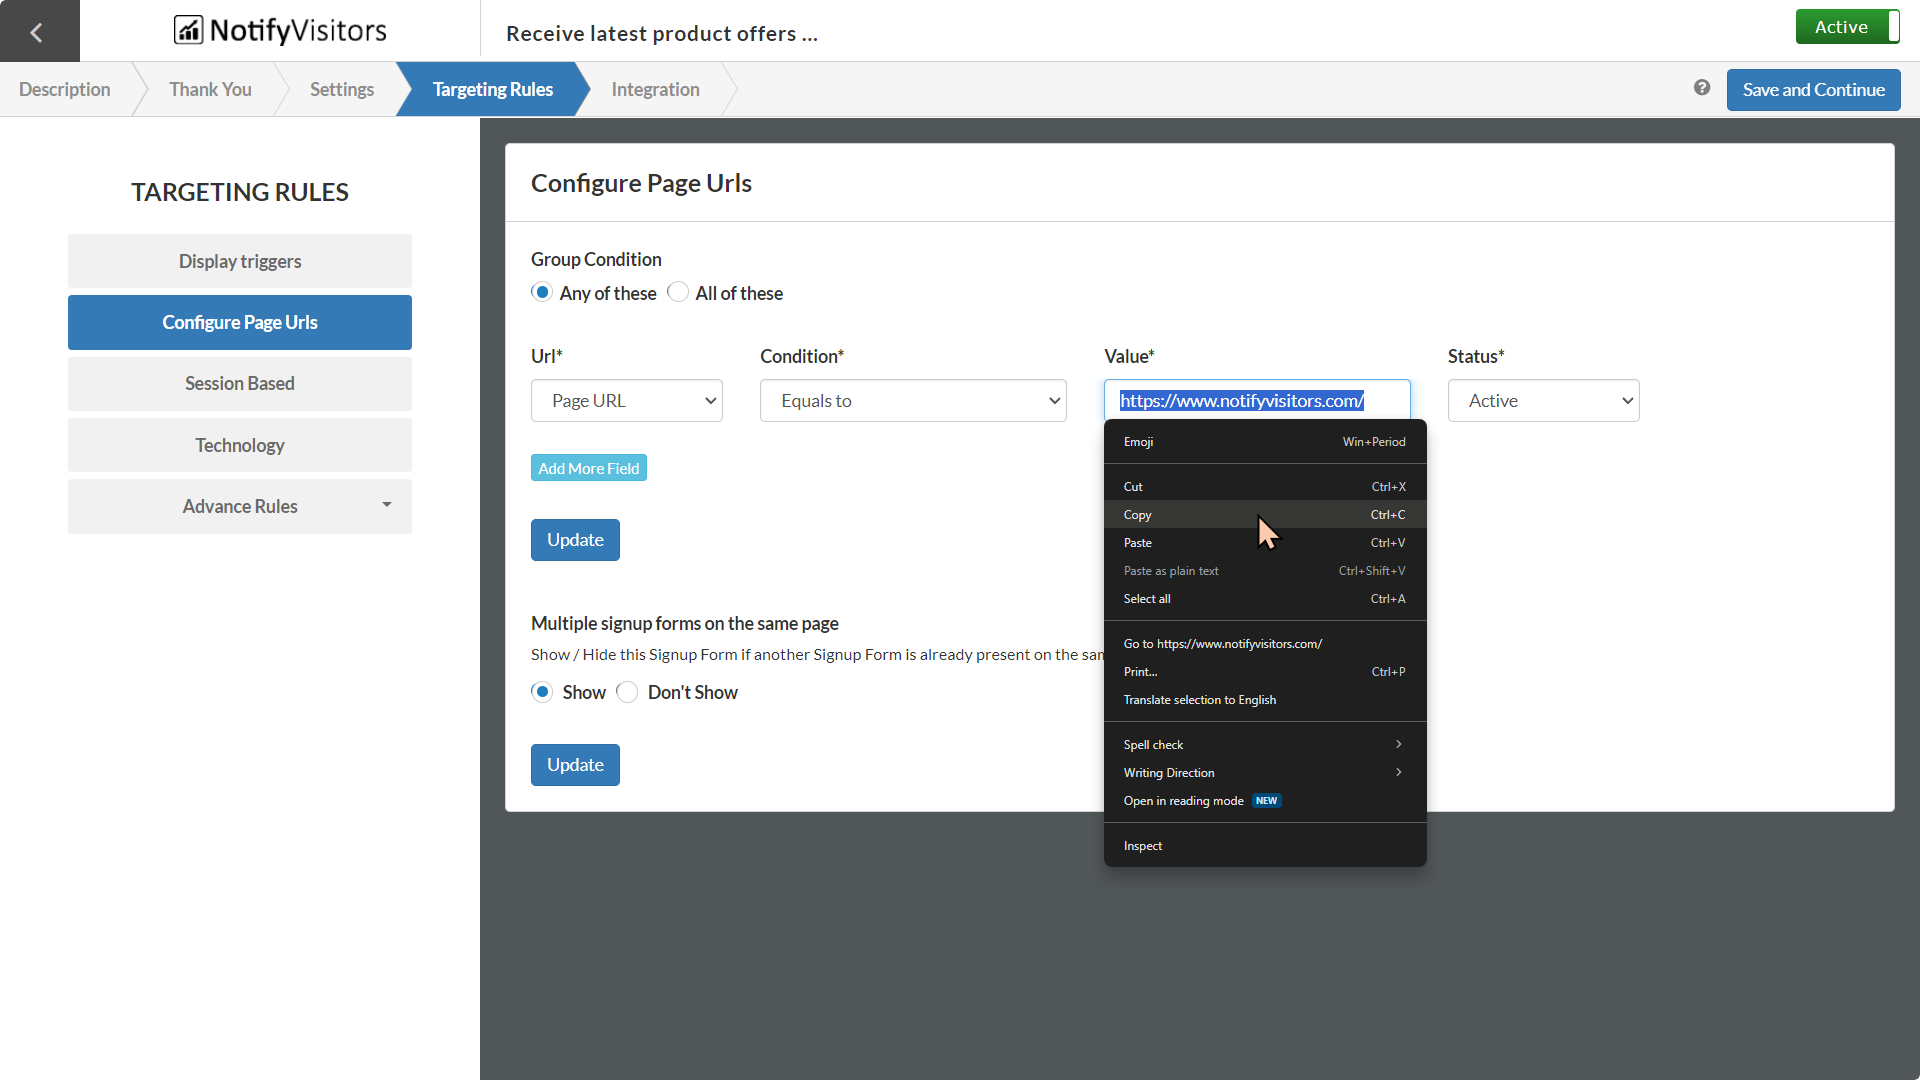
- Configure the targeting rules as described in the article titled 'How to optimize your on-site campaigns with targeting rules' and copy the 'URL' of the web page where you have targeted or deployed the signup form.
- Lastly, publish and activate the signup form as described in the article titled 'How to optimize your on-site campaigns with targeting rules'.
Step 2: Create a segment of potential SMS subscribers
Once you have created the signup form (through which you will acquire users’ consent to dispatch marketing-related communications via the SMS channel), you’ll then have to create a ‘distinct segment’ of potential SMS subscribers.
This is because you will later dispatch email campaigns, strategically tailored to acquire SMS consent, exclusively to those users who haven’t subscribed to receive marketing notifications through the SMS channel.
In case you are a new customer (i.e., you have recently purchased one of our plans), we recommend you to read the undermentioned article in order to acquaint yourself with the process of creating a segment, since it is quite likely that you may not have a clue how to create one using our software.
Here, we’ll briefly explain how to create a segment of potential SMS subscribers:
- Navigate to the Dashboard > Segments > Create Segment.
- Next, click on the option titled 'Actions with User Properties'.
- Upon doing so, the page will automatically refresh and reset to the selected option’s (i.e., 'Actions with User Properties') blank configuration state, so that you may begin defining your new segment.

At this point, you would also notice that the segment you are about to configure doesn’t yet have its own unique name, since a segment can only be named and created after all its rules have been defined.
-
Process described hereinafter is illustrated in the GIF provided below.

- Next, click on the button titled 'Add User Property' present in the 'User Profile' subsection.
- Upon doing so, a new row of three consecutive dropdowns (namely Attribute, Condition, Value) will appear within the same subsection. You can now configure the property through these dropdowns.
- Click on the property’s 'Attribute' dropdown and select the option titled 'Email'. Similarly, from the 'Condition' dropdown select the option titled 'Is Exist' and from the 'Value' dropdown select the option titled 'Yes'.
- At the extreme end of the row, you’ll notice that there exists a '+' button. You can include and configure additional user properties within the same subsection i.e., 'User Profile' by means of this '+' button. Kindly click on that button.
All properties added and configured within this specific subsection are linked to each other via the 'AND' operator. Meaning, the software will filter out data of exclusively those users (in your entire customer base) who fulfill 'all' the properties defined within this subsection and only then feed it into the segment.
- Upon doing so, a new row containing the aforenamed dropdowns will appear. Click on the 'Attribute' dropdown and select the option titled 'Mobile', from the 'Condition' dropdown select the option titled 'Is Exist' and from the 'Value' dropdown select the option titled 'No'.
Collectively, these two properties (linked via the 'AND' operator) will filter out data of exclusively those users whose email is currently registered within the software’s database and who, in the past, had opted-in to receive marketing-related notifications via emails but had not yet provided their consent to receive such communications through the SMS channel.
- Next, within the subsection titled 'Users Behaviors – Actions with User Properties', you’ll notice that by default, there exists a blank 'Rule' titled 'Rule: 1'. Kindly delete that 'Rule' (by means of clicking on the 'Delete' button) since it isn’t required by the software to populate the segment as intended.
- Activate the 'Precomputed' option by clicking on its checkbox. Then, click on the button titled 'Create'.
- Upon doing so, a new pop-up titled 'Segment Configurations' will appear on-screen, wherein you’ll have to input a name and choose a label for your segment.
- Enter a descriptive name such as 'Potential SMS Subscribers' for your segment, choose an appropriate label for it (this is optional) and then click on the 'Update' button present within the same pop-up.
- Finally, click on the 'Publish Segment' button to publish the segment.
Step 3: Create a campaign encouraging email subscribers to sign up for SMS
After effectuating the aforementioned steps, you will have to design an email campaign incorporating an 'SMS signup button' which upon being clicked will redirect users to the webpage where you had deployed the signup form and then dispatch that email to the right segment namely 'Potential SMS Subscribers'.
Hereinafter, we’ll succinctly delineate the procedure to create the aforestated type of email campaign and dispatch it to the intended segment.
- Navigate to Dashboard > Campaigns > Create Campaign > Email.
- Within the 'campaign builder' frame that appears next, fill in the input fields with the requisite information and configure settings for the 'Recipients' stage.
- Within the 'Recipients' stage of the 'campaign builder' there exists a subsection with the exact same title. In that particular subsection, you would notice that there exist two options (to precisely choose the 'Audience' of your campaign) namely:
- Send to all users
- Send to users in multiple segments and/or don’t send to users in certain segments
- Kindly select the second option.

- Upon doing so, an 'Audience' configuration module will automatically appear in the aforementioned subsection, wherein you can accurately specify to which all segments the campaign should or should not be targeted.
- As illustrated in the GIF provided above, through this specific module, target the campaign to users belonging to the segment of 'Potential SMS Subscribers' (the one you created in the previous step). Then, click on the button titled 'Continue To Content'.
- Within the next stage i.e., the 'Content' section, you’ll notice that there exist 'four' distinct options to design your email campaign’s content. Kindly click on the 'Drag and Drop' editor option.
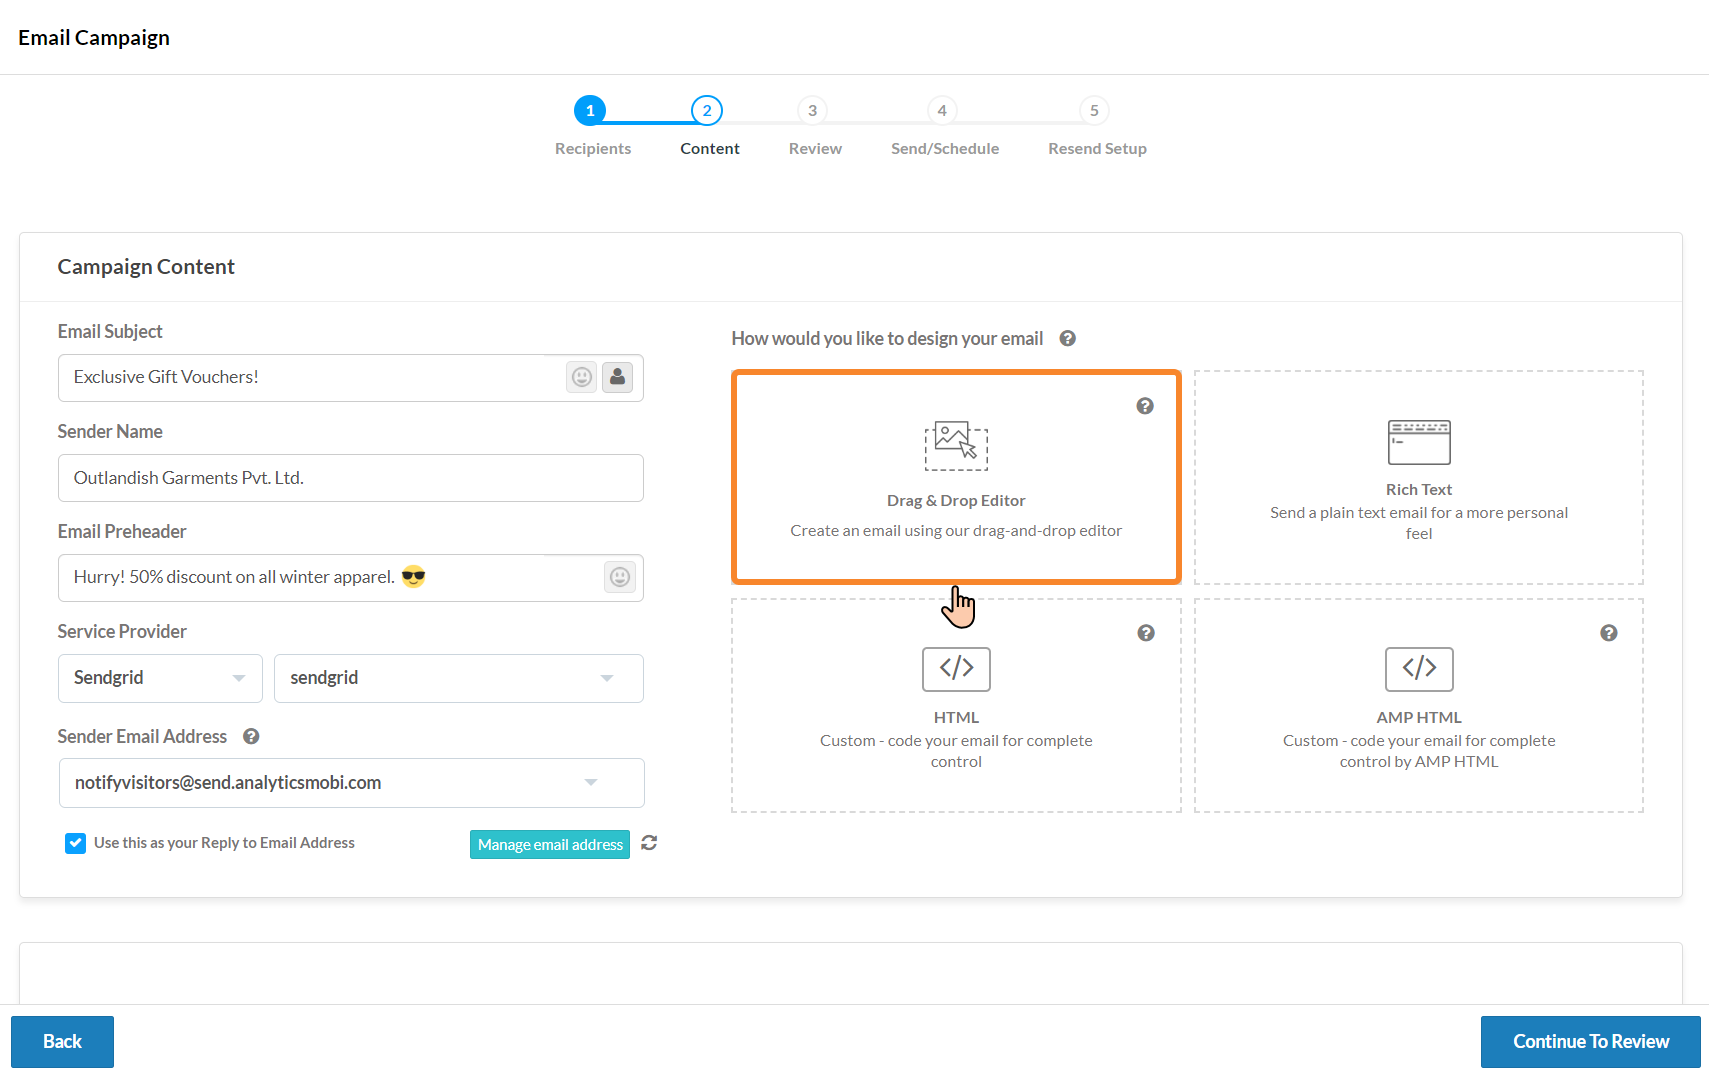
- Once you click on that option, an array of configurable or editable predesigned templates will appear within the 'campaign builder'. You’ll also have the option/flexibility to either choose an already existing template or create a new one from scratch.
No matter whichever way you choose to fashion the content of your email campaign, you’ll have to include a 'button' in it that redirects users who click on it, to the web page where you had deployed your SMS signup form. To do so, simply proceed as follows:
- Clicking on either a pre-existing or a blank template will trigger the 'template editor' to appear on-screen which in turn consists of various configurational tools or editing options (partitioned under three tabs namely 'Content' , 'Rows' and 'Settings') that enable you to remodel and modify the campaign template.
- Under the 'Content' tab of the 'template editor' you would notice that there exists a 'Button Block'. Simply drag and drop the 'Button Block' into the template at the exact position where you intend to place the 'button'.

- Next, click on the 'button' you inserted within the template. Upon doing so, various functional and aesthetic configurations available for buttons will appear under the 'Content' tab. A tiny pop-up containing various options to edit the text of the 'button' will also appear on-screen (check the GIF provided above for illustration).
- Under the 'Content' tab you would notice that there exists a 'Link URL' field. Add the URL for the landing page where you had deployed the SMS signup form within that specific field. Next, add a descriptive text for the 'button' such as 'Signup for SMS'.
- Configure the remaining settings (if any) for your email campaign and then click on the 'Save' button located at the top-right corner of the frame. Then, exit the template editor by clicking on the 'Back' button present the top-left corner.
- From here onwards, continue configuring your email campaign following the process described in the article titled 'How to create an email broadcast campaign'. Finally review and dispatch your campaign as delineated in the same article.
You will have to strategically design your campaign and tactfully phrase the content within it i.e., in a persuasive manner so as to encourage the receivers to click on the 'button' and ultimately provide their consent to receive communications via the SMS channel.
We recommend that you save the email campaign you create as a ready-to-use template, since you might need to dispatch such mails periodically to the segment of 'Potential SMS Subscribers'.
This is primarily because new customers continually get added to the customer base and thereby get recorded with the software’s database. Many of such newly registered customers might have consented to receive communications via emails and will thereby get included within the aforementioned segment of 'Potential SMS Subscribers'.
Step 4: Review results
Remember to keep track of your new SMS subscribers i.e., measure the success of your email campaign in procuring SMS consent, by means of tracking the total number of new subscriptions received through the 'SMS signup form'.


You can, by checking the 'SMS signup form' analytics, ascertain the total number of users who actually submitted the form. This way, you can attribute the total number of signup form submissions, against your email campaign. Click here to learn more about signup form analytics.

 Email
Email SMS
SMS Whatsapp
 Web Push
 App Push
 Popups
 Channel A/B Testing
  Control groups Analysis
 Frequency Capping
 Funnel Analysis
 Cohort Analysis
 RFM Analysis
 Signup Forms
 Surveys
 NPS
NPS Landing pages personalization
  Website A/B Testing
  PWA/TWA
 Heatmaps
 Session Recording
 Wix
Wix Shopify
 Magento
 Woocommerce
 eCommerce D2C
  Mutual Funds
 Insurance
 Lending
  Recipes
  Product Updates
 App Marketplace
 Academy


