
 Email
Email SMS
SMS Whatsapp
 Web Push
 App Push
 Popups
 Channel A/B Testing
  Control groups Analysis
 Frequency Capping
 Funnel Analysis
 Cohort Analysis
 RFM Analysis
 Signup Forms
 Surveys
 NPS
NPS Landing pages personalization
  Website A/B Testing
  PWA/TWA
 Heatmaps
 Session Recording
 Wix
Wix Shopify
 Magento
 Woocommerce
 eCommerce D2C
  Mutual Funds
 Insurance
 Lending
  Recipes
  Product Updates
 App Marketplace
 Academy
In this month’s release notes, we will be highlighting some of the major updates. We are thrilled to present the following new additions:
- Product feed option for website popups: This feature enables you to display personalized product recommendations in website popups.
- Multiple authentication keys: Allows you to create multiple API keys and deactivate the ones that are not needed.
- Schedule user upload: You can now schedule the uploading of user lists for a later time.
- Website form tracking: This feature allows you to monitor users and events, along with their attributes, during lead form submission.
Let’s take a closer look at each feature to learn how they function and how to integrate them.
1. Added product feed option for website popups
In our previous updates, we introduced a feature that allows you to add products from your catalog to your website banner. This feature requires manually selecting the products to be displayed in the website popup.
In this new release, we are excited to announce a dynamic option called “Populate product from feed”. This option enables you to show products in your website popup based on user preferences, browsing history, newly added products, best selling products, and more. Previously, this option was only available for use in email campaigns.
To use this option in your website popups, make sure your catalog is synced with NotifyVisitors and that you have created a product feed from your catalog. For more information, please refer to the provided links.
Once your catalog is synced, go to Onsite Campaigns > Website Pop-up > Pop-ups tab. Here, you can either create a new popup or edit an existing one.

In the editor, click on the “Rows” section and select the “Countdown Timer & Search Products” option from the dropdown menu.

Then, choose the “Search Products” feature and select the “Populate product from feed” option. After making your selection, click on “Continue” to proceed.

You will then see a list of your created product feeds. Choose the one you prefer and click on “Continue with feed”.

Next, you will be presented with display properties, including fields to be included, CTA button, orientation, carousel configuration, and more.

Make any adjustments according to your preference and click on “Continue”.
A row with products will be created. Simply drag and drop this row onto your website pop-ups and you’re done.

Make any design adjustments and set targeting rules as required, and your pop-up is all set. Finally, click on the “Active” button to make it live.

With this new option, all website visitors will now see unique and personalized products based on your defined product feed options.
2. Introducing option to add multiple authentication keys
We have also included an option to create multiple API keys in your NotifyVisitors account. By default, there is only one API key provided in your account, which is suitable for all types of integrations such as web SDK, android SDK, reporting API, and other API integrations.
To find your API key, navigate to settings and then store integration. On the right side, you will find your default key. Just click on the default dropdown to view the API key.

If you wish to add multiple API keys, simply click on the “Create New Key” button. Give it a name and choose the scope for which you want to use this API (select one, multiple, or all scope options as needed). Finally, click on “create” to add it.

There is also a button available to enable or disable any of your API keys, including the default one. Moreover, if you need to edit or delete any added API key, click on the three dotted button next to it and select edit or delete. Keep in mind that the default API key can only be disabled; it cannot be edited or deleted.

This feature comes in handy when you require different API keys for each app, or if your original API key has been compromised or used by third-party vendors but you are unable to remove it. In such scenarios, you can easily generate new keys or disable the ones that are not needed.
3. Added option to schedule user upload
We’ve recently introduced a new feature that allows you to schedule user uploads using a CSV file for a later time. Previously, the only option available was to upload users instantly.
To schedule a user upload, simply follow the standard process. Go to the settings section, choose Upload users, then click on the “Upload / Create User Data” button and select your CSV file.
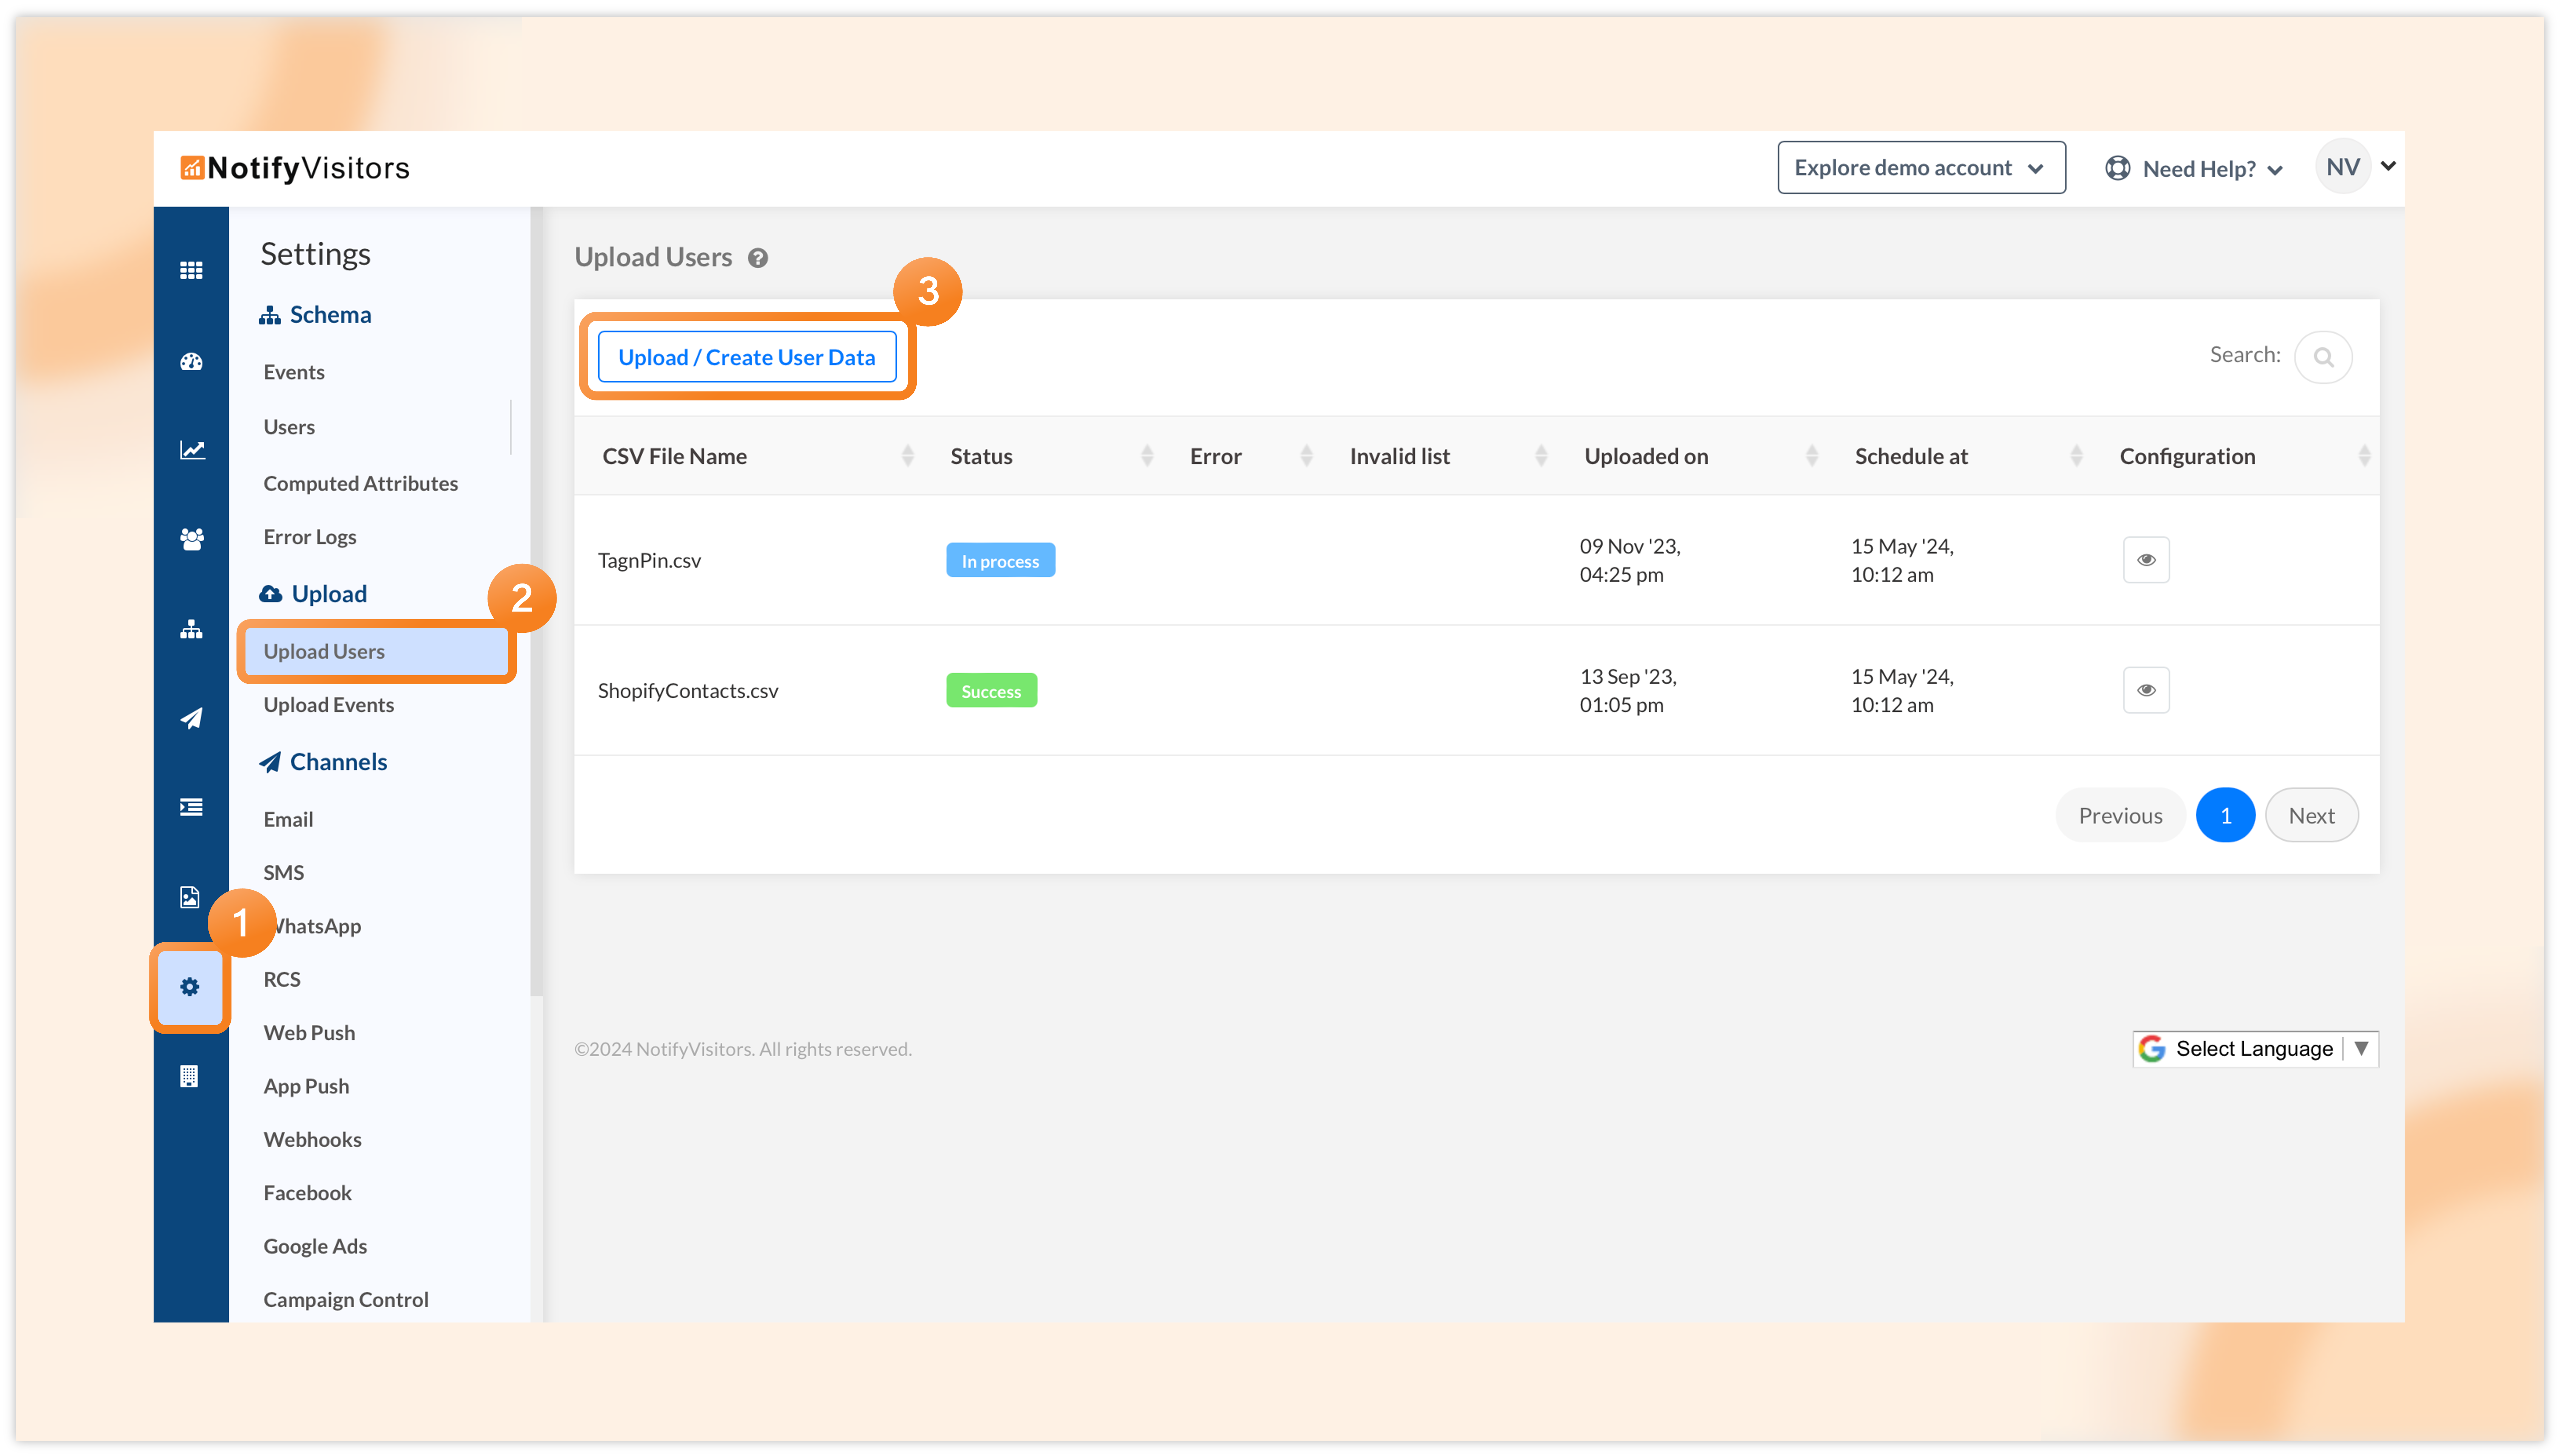
Once you have uploaded the CSV file, you will be prompted to map the necessary fields. Once you have completed this step, simply click on “Next.” From there, you will have the choice to select a segment and decide between “Upload Now” or “Upload Later” at the bottom of the window. If you choose to upload later, you can schedule the upload by selecting a specific date and time. After setting your preferred time, just click on the upload button, and your user list will be scheduled for uploading.

In case you change your mind or need to cancel the upload before the scheduled time, just click on the delete button next to your scheduled user list.

Please remember that you can only schedule uploads for up to a week in advance.
4. Introducing website form tracking
We have introduced a new feature that allows you to easily track website lead/signup forms, including all the user information and events associated with them.
To start tracking forms, navigate to settings, then users, and select the “Website form tracking” tab. Click on the “Track form” button.

Enter the form name, and paste the URL of the webpage where the lead form is located. Click on Load form to load all forms on that page. Then, click on the “Track form” button for the specific form you wish to track.

A window titled “Form Tracking” will appear, showing all the fields and their CSS selectors. If any selector is not filled automatically, you can manually enter it. Next, you need to map the form fields to the user attributes to track the form data, such as name with name, address with address, and so on. It is important to map at least one field with the User ID attribute, which can be either email or phone number. Our system uses this attribute to identify the user.

If you also want to track events related to your lead form, simply turn on the “Enable Event” button. From the dropdown menu, you can select an existing event like “Form Submission” or create a new event by typing in new name and selecting the “Create new event” option.

Once you have done that, the “Event attributed mapping” column will be enabled. You can map the fields with the relevant attributes of the event or create a new event attribute by typing in its name and selecting the “Create new event” option.
Also, make sure to checkmark the required options for the fields that are necessary for tracking. If any required field is left blank by the user, tracking will not occur for both the user and the event. Once you have completed all the necessary steps, click on “Continue”. On the next page, you will have the option to select targeting rules such as device type, browser, operating system, website, and PWA.

By default, all sources will be enabled for tracking. However, if there are specific sources from which you do not want to track users and events of form submission, you can uncheck them. Finally, click on “Update” and “Finish” to create your form tracker.
Make sure to activate the status in order to begin tracking. Once done, your lead form’s users and events will be tracked.

Please be aware that the lead form will not be tracked if your page redirects to another page after submission or if the lead form is embedded using an iframe tag.
Conclusion
With these new features, we aim to enhance your experience and provide greater flexibility in managing your campaigns and user data. The addition of dynamic product feed options, multiple API keys, scheduled user uploads, and website form tracking are designed to streamline your processes and improve user engagement.
To stay informed about our latest releases and access these features immediately, click the “Allow” button at the top of your screen for push notifications. For inquiries, suggestions, or a demo, reach out to us at support@notifyvisitors.com. Our dedicated team is ready to assist, ensuring you maximize the benefits of these exciting enhancements.

In these release notes, we will be discussing some of the key releases for the month of June. We are Read more

Welcome to our latest release notes! This month we released some new features to optimize your experience related to onsite Read more

Welcome to our latest release notes! This month, we are excited to introduce several new features and enhancements for catalog Read more

Introducing our latest release notes! This month we’ve introduced several powerful tools aimed at increasing engagement, streamlining workflows, and providing Read more